

How To Sand Drywall Repair
How to Sand Drywall
Techniques and tools for sanding drywall so it'south perfectly polish, plus tips for dust control.
![]() Fourth dimension
Fourth dimension
A full day
![]() Complication
Complication
Beginner
![]() Cost
Cost
$51–100
Introduction
After y'all've hung and taped drywall, follow these steps to sand it perfectly smooth. We'll bear witness you lot techniques the pros use to get sanding done quickly with fantabulous results.
Tools Required
Materials Required
- 15-dust Drywall sandpaper
- Drop Cloths
- Hat
- Sanding sponges
- Window box fan
Prepare for Dust-Lots of It!
Drywall sanding is 1 of the worst jobs in construction. It'southward non only dirty and grueling only also stressful because now you accept to ready any earlier mistakes. Skillful sanding results are built on the foundation of good taping, and the final sanding is your concluding chance to get the whole job right. The pigment job will reveal the truth: Either you succeeded—all the fasteners and seams look uniformly invisible—or whatsoever taping and sanding flaws are now glaringly apparent forevermore. No wonder so many homeowners choose to rent out drywall work.
Sawdust isn't just a wellness hazard; it can cause falls and fires, also. These v dust collection tools tin assist continue your shop safety and clean.
Accept middle: If you're patient and pay attention to detail, you can tackle this job! We'll show y'all the sanding steps and finishing techniques the pros apply to go sanding done quickly with excellent results.
Our Best Sanding Drywall Without Dust Tips:
Drywall grit is fine, like flour, and will travel to other areas of the house. To prepare your house for the work alee and reduce this dust, follow these steps:
- Lay dropcloths. Apply plastic sheeting and masking tape to seal off cold-air return ducts and doorways. Mount box fans in windows (exhausting out) to ventilate the room. Remove the screens from your windows and doors before starting work to avert having to clean drywall grit from them afterward.
- Go the proper safety equipment: a two-strap grit mask (inverse every one-half hour if yous're working in under-ventilated areas) or a respirator—both types rated for drywall work—plus a hat, glasses (goggles fog upward) and comfortable wear.
- Don't forget the psychological aspect of drywall sanding: The work goes much quicker and easier if you recruit a helper and turn on your favorite music!
Project step-by-step (9)
Step i
Fourth dimension Saving Tip: Capture Dust at the Source
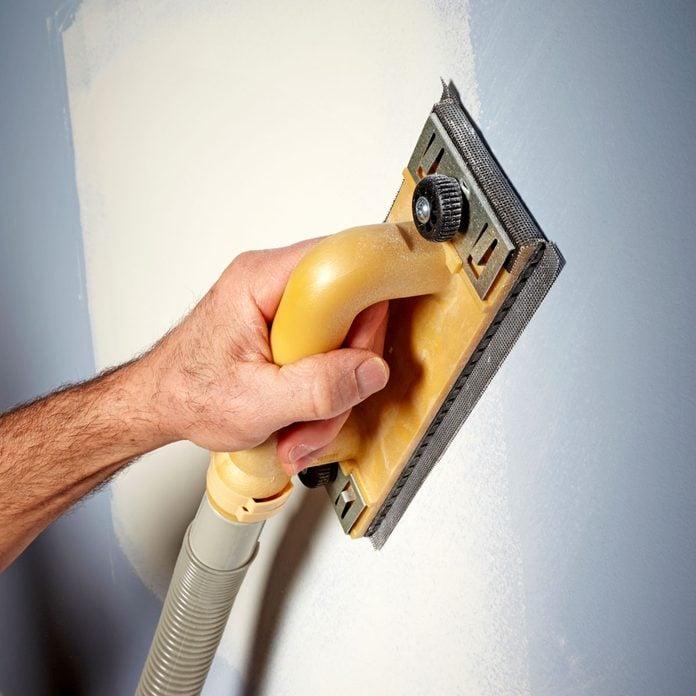
If y'all have ever sanded drywall, y'all know what a mess drywall dust can be! For way less than yous'd think, you can practically eliminate the problem with a dustless drywall sanding attachment for your shop vacuum. This one from Hyde Tools (No. 09165) comes with a vi-ft. hose and adapters to simplify the connection to your vacuum cleaner.
Get this Drywall Sanding Zipper on Amazon.
Step 2
"Map" Walls and Ceilings First

Earlier sanding, circular up a "shadow lite", a wide taping blade and a pencil (non a felt tip pen; it bleeds through paint). "Map" all wide seam work on ceilings and walls to plan how much to sand each seam. With a backlight positioned on one side of a wall or ceiling, identify your taping bract across the end of a seam, slide the blade along the seam, so, every 4 ft., characterization the spots "high," "fill" or "even."
I use the following labeling codes:
- High. If lighting reveals a loftier spot in the middle of the seam, sand the high spot downwards then the seam is uniform and even. Avoid sanding off so much joint compound that you expose and scuff the underlying drywall record. If that happens, use a wide blade and more mud to build out the seam from the high spot to both outside edges, permit the mud dry, map the seam over again and and then sand information technology.
- Fill. If light shows only at the heart of the blade, the seam needs more "mud" fill. Recoat with more mud and let it dry out before you sand it. Employ an "like shooting fish in a barrel-sand" joint compound, which is bachelor at dwelling centers and hardware stores in 25-lb. bags of pulverisation that you mix with h2o. Add the mud, let it dry, so sand the seam; yous tin unremarkably do information technology the same day.
- Fifty-fifty. If the light is uniformly blocked along the length of the blade, sand the seam minimally and evenly.
![]()
Step iii
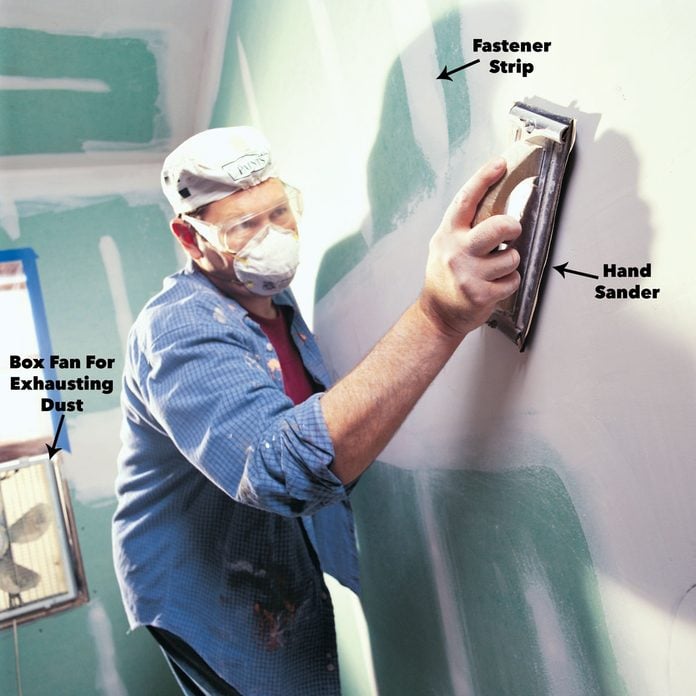
Two Tools Handle the Bulk of the Sanding Work
For 80 percentage of your work, you'll utilize a hand sander on the lower walls and a pole sander on both the high portions of walls and all ceilings. Both tools accept disposable, custom-sized sanding screens (which come up in one choice of surface coarseness, or "grit") or sheets of sandpaper (various grits). Use these tools to rapidly grind downwardly loftier spots or smooth the even spots on all flat seams, outside corners and fastener strips.
Set work lights so they polish across the seams to highlight flaws in the taping work. Spend the time at present to perfect your sanding; it'll pay dividends once you paint and must alive with the results.
Open Mesh Sanding Screens Yay or Nay?
Some pros utilize "open up mesh" sanding screens, only about practise-information technology-yourselfers should avert them. The open mesh allows the drywall dust generated during sanding to pass through and off the sander. Still, screens are prone to leave scratches on the finished surface and wear out faster than sandpaper.
Best Results From 150-Grit Drywall Sandpaper.
Almost workers get the best results from 150-grit drywall sandpaper. The pores of drywall sandpaper may appear to exist clogging during use, just drywall dust actually becomes an additional abrasive to both grind and polish the taped surface, yielding a smoother cease and extending the life of the sandpaper. However, for easier and speedier sanding, you'll still need to alter sandpaper sheets oftentimes (an average-size bedroom will take 3 or four sheets of sandpaper).
Step 4
Apply Fifty-fifty Pressure
Apply an fifty-fifty-pressure, push-pull motility to work a paw sander inside the flat seams and along the narrow vertical boom/spiral patterns. Piece of work the edges of the seams or strips with this push-pull stroke or use a circular, buffing motion to "feather out," or smooth, the transition edge betwixt the seam and the bare drywall.
To smooth out shallow scratches in a seam or screw/boom pattern (called a "fastener strip"), use calorie-free pressure on the paw sander and move it in a round buffing move.
Note: We used h2o-resistant drywall because its green color provides more visual dissimilarity between the drywall, the taped seams and the strips. Don't apply water-resistant drywall on ceilings (it sags). Also, cheque with a building inspector; many areas practice not permit its employ on exterior house walls.
Stride 5
Using a Pole Sander
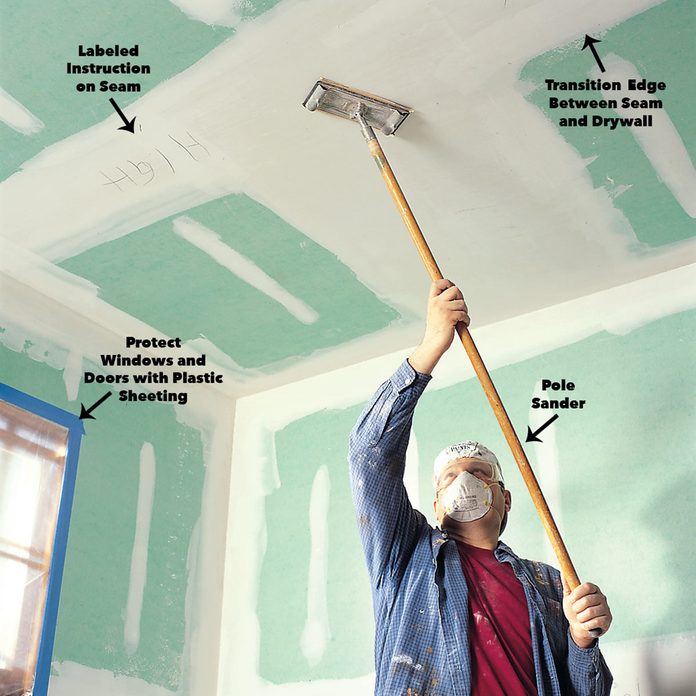
Utilize a push-pull stroke with a pole sander. Your arms may turn to rubber, but using a pole sander is faster and easier than working a hand sander from a ladder.
Tips for Using the Pole Sander.
- Pole sanders are more than difficult to control; apply either the push-pull motion or a side-to-side sweeping motion.
- Twist the handle to control a ball joint on the sanding caput that volition shift the movement of the head and permit the sander to both switch directions and turn effectually the within corners where seams see.
- Turn the caput of the pole sander wider to work across seams or narrower to sand along fastener strips.
- Confine hand and pole sanders to the "field" of a wall or ceiling. If you work too close to within corners, these tools may slam into side by side walls, denting or gouging the stop.
- The pole sander, with its ball joint in the sander caput, is prone to flip over ("jackknife") and cause damage.
Avoid Scuffing the Drywall.
Carefully sand the transition edge between the taped seams/strips and the blank drywall to avoid scuffing the drywall's newspaper face. Avoid scuffing or chafing the paper surface of the drywall because those flaws may be visible after painting. The edges of all seams and fastener strips should wait soft and smooth later they're sanded.
***Don't use h2o-resistant drywall on ceilings. Nosotros used it for photograph clarity.
Step vi
Three Common Problems
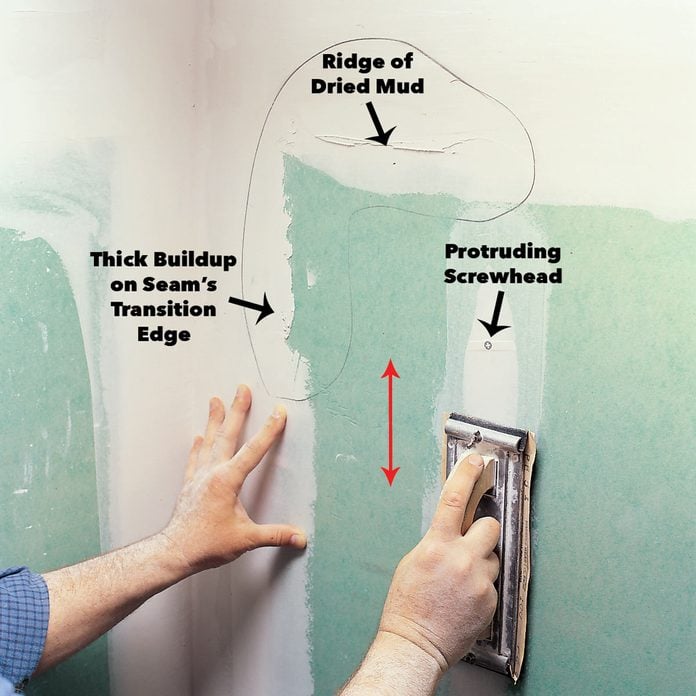
Certain problems ingather up during this stage of drywall sanding and then be aware of three common problems as you sand:
- Hide a protruding screw (or boom) by offset setting the fastener properly below the drywall'south surface and then applying two coats of easy-sand mud.
- Knock off a ridge of dried articulation chemical compound on a seam with a modest taping blade and smooth the surface with one sparse coat of easy-sand mud.
- If y'all have a thick buildup on a transition border, avoid heavy sanding considering you lot'll likely scuff the adjacent bare drywall. Instead, use a 6-in. blade to feather some other layer of the easy-sand compound around the inside corner where these ii seams come across.
Footstep 7
Sand with a Light Touch for Painting Prep

Once you've done the bulk of the sanding, switch gears and tools to finish tricky "finesse" areas like those around electrical outlets or lights, and inside corners. Yous tin can choose a hand sander for finesse work, but a better choice around outlets is handheld sandpaper.
Command sandpaper with an easy, low-cal touch to avert scuffing and gouging the surface finish. If your sanding does uncover and then scuff articulation record, use more mud, feather it out, permit the mud dry out and carefully sand once again.
Step eight
Using a Sanding Sponge
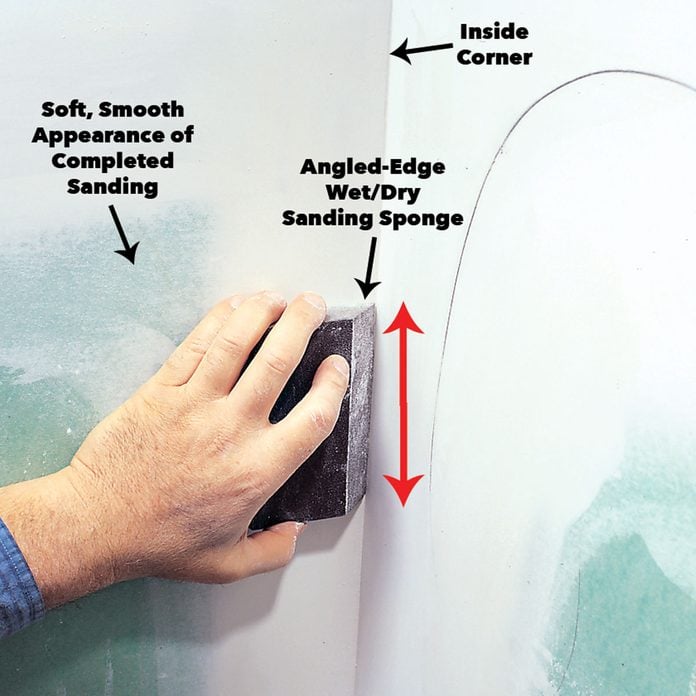
Hand sanders piece of work great on inside corners, but while smoothing one side, you may stop upwards over-sanding the opposite side, cutting a deep channel that will require a impact-up of mud to fix. Instead, utilise a fine-grit, angled, wet/dry sanding sponge to piece of work each side of the inside corners.
Firmly grip an angled sanding sponge, apply steady pressure and move information technology upwards and downward inside corners for a straight, well-defined edge. Then move the sponge in either a button-pull or circular move to feather the transition edge of the finished corner seam.
Step 9
Training for Painting
In the past, afterward sanding my drywall, I prepared for painting by either sweeping the surfaces or vacuuming them to clean off all the dust. Wrong, say many experts. They advise minimal wall and ceiling cleaning. Sweep off the accumulated dust from the within corners and any dust assurance from wide taped seams and fastener strips. Otherwise, exit an even coat of dust over the entire drywall surface, especially along the transition edges of the seams and fastener strips. The dust will bind with the paint and provide a filler to mask scratches, pinholes and chafed surface paper.
Grit—your opponent throughout the early stages of drywall work—ironically becomes an ally at the end to meliorate the paint job and help evangelize the fine results you've worked toward.
Plus, bank check out these 19 best-kept secrets of professional person painters.
Originally Published: March 01, 2022

How To Sand Drywall Repair,
Source: https://www.familyhandyman.com/project/how-to-sand-drywall/
Posted by: currierbied1942.blogspot.com
0 Response to "How To Sand Drywall Repair"
Post a Comment